| Suspension issues with a newly made vehicle [message #375659] |
Tue, 10 March 2009 07:16  |
 Reaver11
Messages: 888
Registered: April 2007
Karma: 1
|
Colonel |
|
|
Latelty I have been very captive with modeling new vehicles in my spare time.
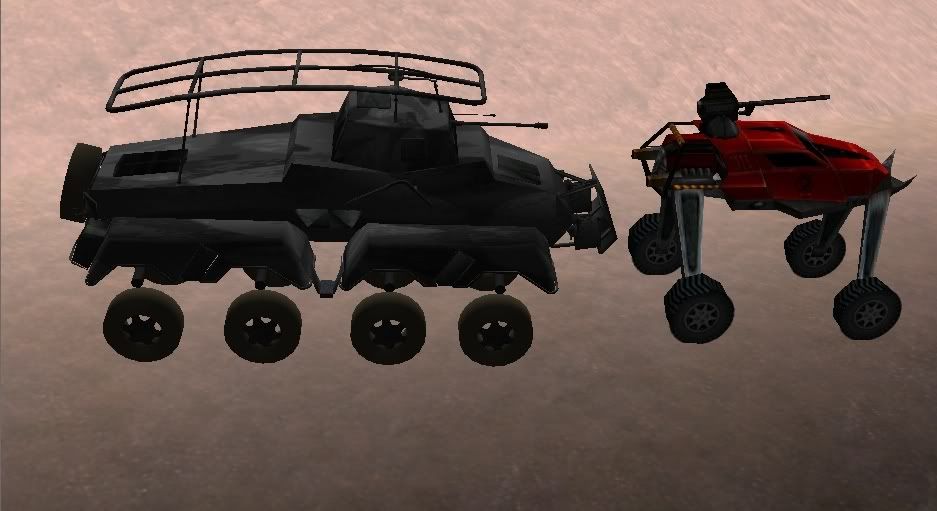
Only there is one issue that bother me. As you can see on the buggy the bars between the vehicle and wheels is conected. On the other vehicle the suspensionbars are not moving. (These vehicles are floating in normal state everything is fine but not when I drive over bumps with the panzervehicle)
Also how do I set up a proper uvw map for tank treads ->
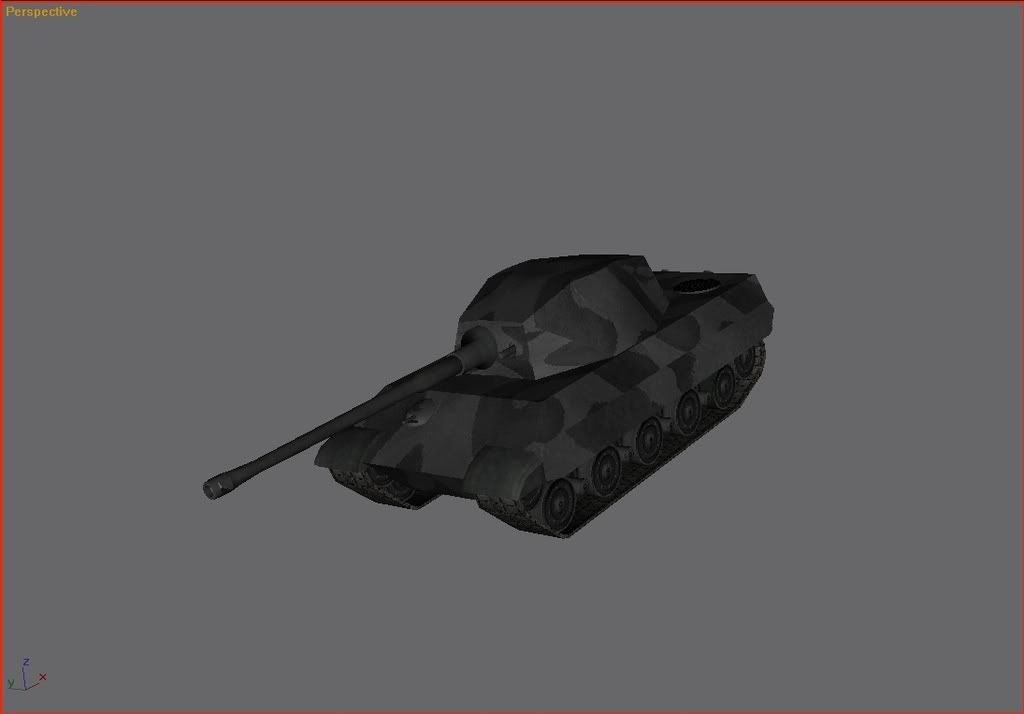
At the moment they are moving only the interior of the threads move the wrong way. [reverse direction](The vehicle is wwskinned so the wheels can clip through the treads)
Can anyone help me?
[Updated on: Tue, 10 March 2009 17:22] Report message to a moderator |
|
|
|
|
|
|
|
|
|
| Re: Suspension issues with a newly made vehicle [message #375803 is a reply to message #375776] |
Wed, 11 March 2009 02:07   |
 Reaver11
Messages: 888
Registered: April 2007
Karma: 1
|
Colonel |
|
|
| Gen_Blacky wrote on Tue, 10 March 2009 22:30 |
when u wwskin them and you link the vertices to where u want it should follow the mesh where its linked 2.
|
Correct me when I'm wrong, do you mean the clipping through the tread when driver over a bump? Well that works only the following issues bother me.
I will give you some better screenies ->
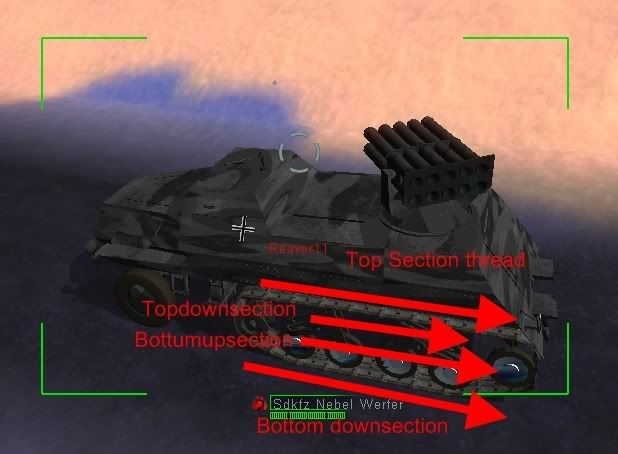
Note the Red arrows these are showing the direction the tread texture is moving although when the vehicle doesnt mvoes it looks pretty but when it moves it all gets sucked up in the end of the tread.
Also the vehicle is standing prefectly on its wheels when the suspensionlength is 0.00
Since a vehicle would not be drivable / enterable I picked 0.5 only now there is that ugly space in between. (The vehicle has its 0 animation frame and 1 animation frame). Only how can i adjust it so it looks good?
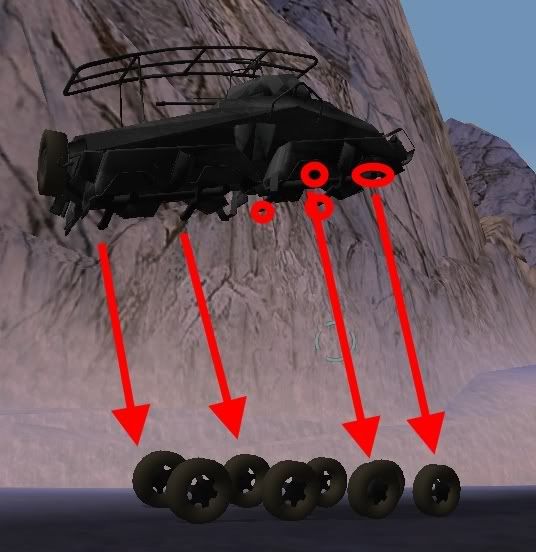
The other issue concerns a wheeled vehicle. The suspension bars / drive bars are not connected to the wheels like that buggy was but how do I make it that way? I suspect something with the wwskin.
EDIT: I didnt see you post yet danpaul, I think im gona re-read that part mayby there are some adjustement tips for the suspension.
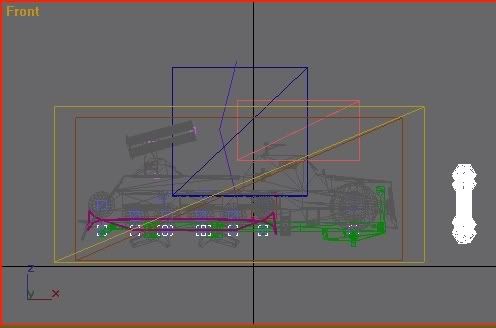
This is how animation frame 1 looks currently.
[Updated on: Wed, 11 March 2009 02:13] Report message to a moderator |
|
|
|
|
|
| Re: Suspension issues with a newly made vehicle [message #375829 is a reply to message #375806] |
Wed, 11 March 2009 09:21   |
 Reaver11
Messages: 888
Registered: April 2007
Karma: 1
|
Colonel |
|
|
| danpaul88 wrote on Wed, 11 March 2009 04:40 |
Make sure animation frame 1 is the currently selected frame when you export the W3D file, otherwise it doesn't work properly.
|
Thank you Danpaul the suspension has improved alot.
Still I have to edit parts of the chassis for example the front suspension ->
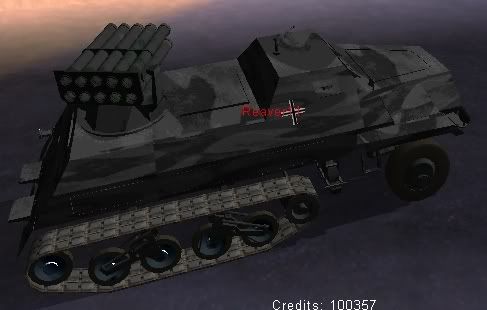
Also does anyone have a clue how to conect the suspension/axel parts to the wheels of that vehicle I showed earlier?
[Updated on: Wed, 11 March 2009 09:21] Report message to a moderator |
|
|
|
| Re: Suspension issues with a newly made vehicle [message #375874 is a reply to message #375659] |
Wed, 11 March 2009 16:22   |
 |
 danpaul88
Messages: 5795
Registered: June 2004
Location: England
Karma: 0
|
General (5 Stars) |
|
|
Make sure that the suspension length in LE matches, or is very slightly greater than, the distance you moved the bones in the animation, then they should both match each other. Also adjust the suspension constant to adjust how solid the suspension is.
Play in single player LAN and edit the settings using f8 -> edit_vehicle to quickly test out different settings until you find a setup that works well, and then write those down and put them back into LE.
EDIT: Re-reading your post I think I might have misunderstood your problem the first time around. If you want the things inside the tracks attached to the wheels to stretch with the suspension you need additional WWSkin bones to do that. Create a standard bone at the join point for each of the wheel things, and then a WWSkin bone for each of them too. Bind the top verticies of the thing to the new join point bone, and the bottom ones to the WheelC WheelP bone for the wheel they attach to.
EDIT2: WheelP is probably a better choice actually, since the WheelC bones spin around and might make your mesh go beserk.

[Updated on: Wed, 11 March 2009 16:27] Report message to a moderator |
|
|
|
|
|
| Re: Suspension issues with a newly made vehicle [message #375914 is a reply to message #375659] |
Thu, 12 March 2009 01:28   |
 Reaver11
Messages: 888
Registered: April 2007
Karma: 1
|
Colonel |
|
|
Well basically I had three question mayby I should have organised them a bit better.
One question remains atm what is the best uvwmap for a tread skin?
At the moment I use 'box' without moving it looks perfectly only some parts are a bit strenched and the internal of the threads move the wrong way. I suspect planer uvw map is the way to go only I havent had it fit yet.
I will try the suspension lateron today.
[Updated on: Thu, 12 March 2009 01:29] Report message to a moderator |
|
|
|
| Re: Suspension issues with a newly made vehicle [message #375916 is a reply to message #375659] |
Thu, 12 March 2009 01:47  |
 |
 danpaul88
Messages: 5795
Registered: June 2004
Location: England
Karma: 0
|
General (5 Stars) |
|
|
In my experience the best way to do it is a manual unwrap, and layout the track as if it was broken at some point and laid flat along the ground. Otherwise you get wierd issues with some parts of the track moving backwards and such...

|
|
|
|


